Chatbox Tutorial
Chapter 3: Customizing the display
Almost all of the aspects of the chat room and private message windows are customizable, but bear in mind that those windows will all share the same display settings. First select the font style of your choice. You may do this from either a chat room or private message window by clicking "Settings", then "Set font name/size..." to see this window: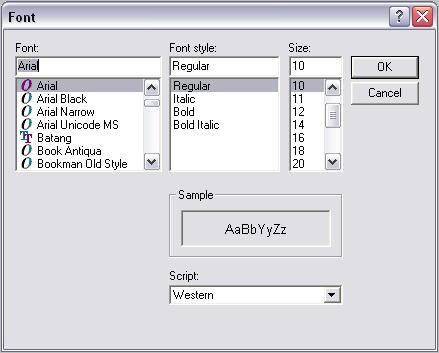 The default is Arial, Regular, 10 pt. Only you see the font style you have chosen, and all incoming messages are formatted to this font. You may select any font from the list, any size, and may even italicize and/or bold all the text. The "Script" box is ignored. This will set the font for the message display box and text entry box on chat room and private message windows, and the user list in chat rooms. The window may attempt to resize itself in the event a large font is selected, and not all fonts are easily viewed. If there are any problems, shoot me an email. Next you can set the colors for the display. From the same "Settings" menu, select "Set colors..." to see this window: 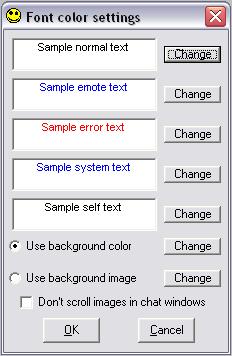 This is where you may set the color for each type of message. For a definition of the message types, check out Chapter 2 of this tutorial. The boxes will display the currently selected background and the font type and colors set for each message type. This is so you can approve of the changes before committing them and losing the existing settings. By clicking the "Change" button next to each message type, you are presented with this window: 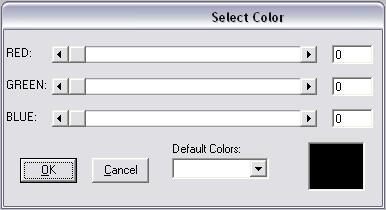 This window will allow you to select exactly the color you want. You can start by selecting an item from the "Default Colors" list. Then move the sliders back and forth to tweak the color exactly to your desire. You may also type in a number from 0 to 255 in the box to the right of the slider. Click "OK" to see your changes applied to the previous window. You will use this same method for selecting a background color, which is applied to the message windows and text entry boxes of private chats and chat rooms, and to the user list in chat rooms. Instead of a background color, the user may select an image to be tiled across the same window components as would be for the selected background color. Just make sure the radio button is highlighted next to "User background image" and click the "Change" button to select a file. The image will be displayed in the text boxes demonstrating the font colors to ensure the image will work given the font and color choices for the text. The final option on this screen is the ability to lock the images on the windows. As messages come in and the message window scrolls down, the image will scroll with it. Some find this distracting and would like the image to stay fixed in place. This anti-scrolling feature will also apply to the room's user list when you scroll through the list. The last part of customizing the display is timestamping. When a message comes in, it might be helpful to know when you received it. The capability exists for Chatbox to add a timestamp to each message as it comes in. From the main window click "Options", then "Settings", and go to the "Timestamp" tab: 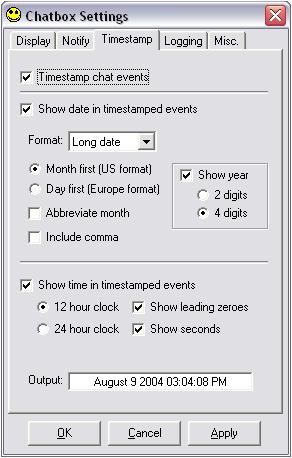 As you can see, there are quite a few options. You can turn timestamping off with the topmost checkbox, or if it's on you can show either the date or the time, or both if you prefer. The date may be in long format, where the month is spelled out, or short format where a delimiter is used to separate the numerical month and date. Both US and European formats are supported, and the user may show the year if they please. Time may be displayed according to the 12 hour clock (which will display AM/PM) or 24 hour, also known as military time. The Output box will show how your current settings would appear in a timestamped event given the present date and time. Play with the options and find what works for you. It's not necessary and by default is disabled, so if you don't want to use it at all then leave it off. At this point you know enough to be able to use Chatbox to communicate with others and to customize your display for maximum enjoyment. In future tutorials I will show you how to set notification options so you don't have to constantly watch for new messages, as well as the other miscellaneous features available in Chatbox. If you like, you can check out Chapter 4: The Command line. |