Chatbox Tutorial
Chapter 1: Connecting
|
Step 1: Click on the "File" menu item and select "Connect", or press CTRL-O. The first thing you have to decide is if you're going to be a server or a client. If you're unsure of what those terms mean, check the terminology page. Basically if you want to be the central contact point and have users connect to you, select "Yes" to be the server. If a server already exists that you wish to connect to, select "No". If you opted to be the server, the display on the main window will be slightly different than on the clients. There are only three things that a server has that a client doesn't: 1) The server displays a list of all rooms, visible and invisible. Clients only see a list of the visible ones. 2) The server displays a list of all connections and therefore a complete list of users connected. Clients are updated only with a list of visible users. 3) A server has the ability to disconnect a client completely. The server has no other special abilities. At this point you will be prompted to enter a nickname, so you can skip to Step 3, the nickname entry portion further down. Step 2: If you chose to be a client, you must search for a server. On the window that appears click the "Search" button, at which time you will see this window appear: 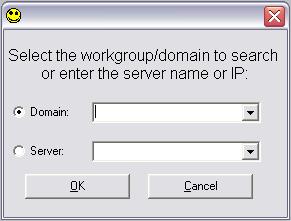 If you wish to search a domain or workgroup, enter the name in the top box. If you know the name or IP address of a computer that you wish to connect to, enter it in the bottom box. Chatbox will remember the last 5 workgroups and the last 10 servers you connected to, which you may select from their appropriate lists. Make sure the radio button on the side has the correct option selected for how you want to search, and click "OK". Now you will return to the previous window, and the search will begin. 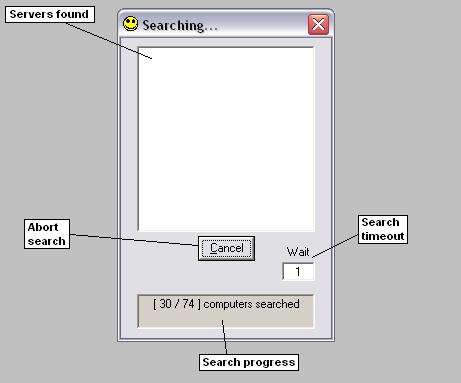 If a server is found, its name and IP address will appear in the list. To abort the search, click the "Cancel" button. If you believe you are unable to find a server due to high network traffic, increase the timeout setting. The timeout specifies how long to wait for a server to respond. Usually the default of 1 second is enough, but it may be increased up to 30 seconds. Finally, the search progress is shown in the box at the bottom. It will display how many computers have been searched, the total number to be searched, and upon completion it will list how many were found. If at least one server is found, double-click the entry in the list to attempt to connect to it. If the connection was successful, you will be prompted to enter a nickname. Step 3: Choosing a nickname:  The window to enter a nickname will pop up, and you may enter any name you wish as long as it is not already in use on this server. The name may be up to 200 characters long (spaces are allowed!), but for logistical reasons it's usually best to keep it under 10. There are certain characters that may not be used for a variety of reasons, but rather than explain the reasons it's best to just avoid using the following symbols: This window will list the last 5 nicknames you have used so that you may simply select your preferred name. If you wish to be invisible from other clients, check the box provided. Invisibility does not mean the other users will never see you. It simply means that in the user lists for inviting a user to a room, writing a new private message, or challenging a user to a game, your name will not appear. There is no way to be invisible to the server, so be aware that whoever is running the server will know you are there. Also, if you are a client, you have approximately 30 seconds to enter a valid nickname or the server will terminate your connection. If this happens, you may simply connect again. When you have entered a nickname that is not already in use and does not contain the illegal characters listed above, you are now connected! If you are the server then the room list will be empty and the connection list will only have your entry in it. As a client, you will immediately download a list of visible rooms and your user lists will be populated with the visible users. On to Chapter 2: Chat rooms and private messages |